Installing Windows from a USB drive is the fastest and most reliable way to perform a clean installation. Whether you are replacing a hard disk, upgrading to a new SSD, fixing system errors, or reinstalling Windows after performance issues, this guide covers the complete process.
If you are planning to reinstall Windows because your computer is slow, you may not need a clean installation immediately. Before proceeding, consider trying these solutions:
- Check and fix disk errors in Windows
- Disable unnecessary startup programs to improve boot time
- Use “Reset This PC” in Windows 10 or 11
Many slow system issues are caused by startup apps, disk errors, or corrupted system files. If those steps do not resolve the issue, continue with the clean installation process below.
Before You Start
- Back up all important files.
- Keep your Windows product key ready (if required).
- Download the correct Windows version (32-bit or 64-bit).
- Make sure your PC meets the system requirements.
- Use an 8GB or larger USB drive.
Most modern systems require 64-bit Windows. Installing 32-bit Windows on a 64-bit capable system limits performance.
Download Windows Installation Files
You need a Windows ISO file before creating a bootable USB.
If you are installing:
- Windows 10 → Use your guide on downloading the official Windows 10 ISO.
- Windows 11 → Use your guide on downloading the official Windows 11 ISO.
Windows 7 and 8 ISO files may require a valid product key from Microsoft’s official site.
Once you have the ISO file, proceed to create the bootable USB.
Windows 11 System Requirements (Important)
Windows 11 is different from Windows 10 and earlier versions.
Minimum requirements for Windows 11:
- 64-bit processor (1 GHz or faster, 2 cores)
- 4 GB RAM
- 64 GB storage
- UEFI firmware
- Secure Boot enabled
- TPM 2.0 support
- DirectX 12 compatible graphics
- 720p display
Unlike Windows 10 and below, Windows 11 requires TPM 2.0 and Secure Boot. Many older computers may not support this officially. In addition to TPM 2.0 and Secure Boot, Windows 11 officially supports only specific processors. Microsoft maintains a list of supported Intel, AMD, and Qualcomm processors. Before installing Windows 11, check whether your CPU is supported by visiting Microsoft’s official compatibility list.
If your system does not meet these requirements, Windows 10 may be the better option.
Create a Bootable USB Drive
There are two recommended methods.
Method 1: Using Media Creation Tool (Windows 10 & 11)
To create a bootable USB drive, you must first download the official Media Creation Tool from Microsoft. For detailed step-by-step instructions on downloading and using the tool, refer to our complete Media Creation Tool guide.
- Insert your USB drive (minimum 8GB).
- Run the tool.
- Select “Create installation media for another PC.”
- Choose language, edition, and architecture.
- Select “USB flash drive.”
- Choose your USB device.
The tool will download Windows and automatically create a bootable USB.
Method 2: Using ISO File and Rufus (All Windows Versions)
If you already have the ISO file:
- Download Rufus.
- Insert the USB drive.
- Open Rufus.
- Select your ISO file.
- Choose:
- GPT (for modern UEFI systems)
- MBR (for older BIOS systems)
- Click Start.
Rufus works for Windows 7, 8, 10, and 11.
Boot from USB Drive
- Insert the bootable USB into your computer.
- Restart the PC.
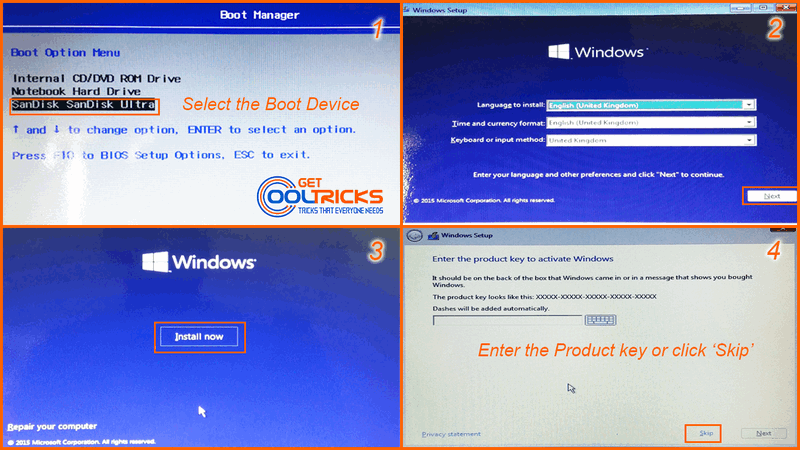
- Open the Boot Menu (commonly F12, F9, Esc, or F2 depending on manufacturer).
- Select the USB device.
Windows Setup will begin loading.
Windows Installation Steps
- Select language, time, and keyboard format.
- Click Next.
- Click Install Now.
- Enter your product key (or click “I don’t have a product key”).
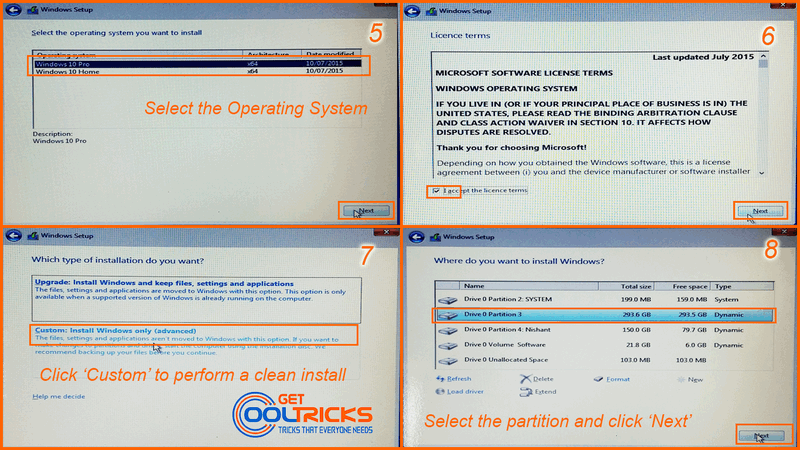
- Select the edition if prompted.
- Accept the license terms.
- Choose installation type:
- Upgrade (keeps files and apps)
- Custom (clean installation)
For a fresh installation, select Custom.
Select Installation Partition
You will see a list of partitions on your drive.
- Select the partition where Windows should be installed.
- Click Next.
For a full clean install, you can delete existing partitions (this erases all data). Windows will create necessary partitions automatically.
Installation typically takes 10–30 minutes depending on your hardware and USB speed. The system may restart multiple times.
First-Time Setup After Installation
After installation:
- Choose region and keyboard layout.
- Connect to a network.
- Sign in with Microsoft account or create a local account.
- Configure privacy settings.
Windows 10 and Windows 11 setup screens are very similar.
Install Drivers and Updates
Most drivers install automatically through Windows Update.
If something does not work:
- Visit your motherboard or laptop manufacturer’s website.
- Download and install the required drivers.
Alternative: Reset This PC (Windows 10 & 11)
If your goal is to fix performance issues rather than replacing the OS, you can use:
Settings → System → Recovery → Reset This PC
This reinstalls Windows without needing a USB drive.
Common Installation Issues
- Cannot install 64-bit Windows on 32-bit CPU
- GPT/MBR partition mismatch error
- TPM or Secure Boot requirement failure (Windows 11)
- Corrupted USB media
- Missing drivers after installation
If installation fails, recreate the bootable USB and try again.
Installing Windows from a USB drive is the most reliable way to perform a clean installation. Whether you are installing Windows 7, 8, 10, or 11, the overall process remains similar.
Windows 11 has stricter hardware requirements compared to Windows 10 and earlier versions, so always check compatibility before proceeding. Make sure to back up your data before installation and try disk repair or startup optimization methods if you are reinstalling Windows due to performance issues.