Windows usually handles most modern plug-and-play devices without any issues. But when you’re dealing with older hardware or certain development tools, things don’t always go that smoothly. In those cases, you may need to install drivers manually using an .inf file.
These are generally called legacy drivers.
You’ll often come across this with:
- Android ADB drivers
- Older printers or scanners
- USB debugging interfaces
- Serial or virtual devices
- Custom development hardware
In this guide, I’ll walk you through how to install these drivers manually on Windows 8, 10, and 11. To keep things practical, we’ll use ADB driver installation as an example.
What is a Legacy Driver?
A legacy driver is simply a driver that Windows doesn’t install automatically.
In most cases:
- It needs to be installed manually using an
.inffile - Windows won’t configure it on its own
- It’s usually tied to older or specialized hardware
The good thing is, Windows still allows you to install these drivers through Device Manager.
Example: Installing ADB Drivers
ADB (Android Debug Bridge) lets your computer communicate with an Android device, especially when USB debugging is enabled.
Sometimes Windows doesn’t install the ADB driver automatically. When that happens, you’ll need to install it manually.
Before You Begin
Before jumping into the installation, make sure everything is set up properly. Most issues happen because something small is missed here.
Step 1: Download the Correct Driver
- Download the driver from the official source whenever possible.
- Also, make sure you’re using the correct version (32-bit or 64-bit) based on your system.
Step 2: Extract the Driver Files
Drivers are usually downloaded as .zip, .rar, or sometimes .exe files.
If it’s compressed:
- Right-click the file
- Click Extract All
- Extract it somewhere easy to access, like the Desktop or Documents
Try to keep things simple here — it helps later.
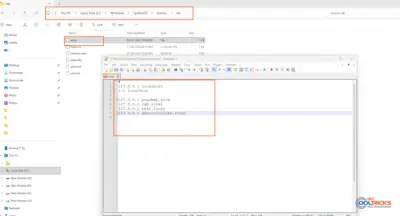
Step 3: Verify the INF File Exists
Open the extracted folder and look for a file ending with .inf (for example: android_winusb.inf).
This file is essential. Without it, manual installation won’t work. If you don’t see one, the driver might not support manual installation.
Step 4: Keep Folder Structure Intact
Make sure that all the files are in the same folder. Do not rename or delete files and subfolders present inside the driver folder.
If you change, installation may fail.
Step 5: Connect the Device
Connect your device to the computer.
- Use the original cable if possible
- Enable USB debugging (for Android devices)
Once everything is ready, you can proceed.
If Windows blocks the driver, you may need to disable Driver Signature Enforcement first.
Method 1: Update Driver (Recommended)
This is the method you’ll use most of the time.
Use it when:
- The device appears in Device Manager
- You see “Unknown Device.”
- There’s a warning icon
Step 1: Open Device Manager
You can open it in a couple of ways:
- Press Windows + X → Device Manager
- Or press Windows + R, type
devmgmt.msc, and press Enter
Step 2: Locate the Device
Look for:
- Unknown Device
- Android Device
- Any device with a warning icon
Right-click it and choose Update driver.
Step 3: Install Using an INF File
- Click Browse my computer for drivers
- Click Let me pick from a list
- Click Have Disk
- Click Browse and select your driver folder
- Choose the
.inffile - Click Next
Windows should install the driver at this point.
Method 2: Add Legacy Hardware
Use this when the device doesn’t show up at all.
Step 1: Open Device Manager
Click your computer name at the top of the device list.
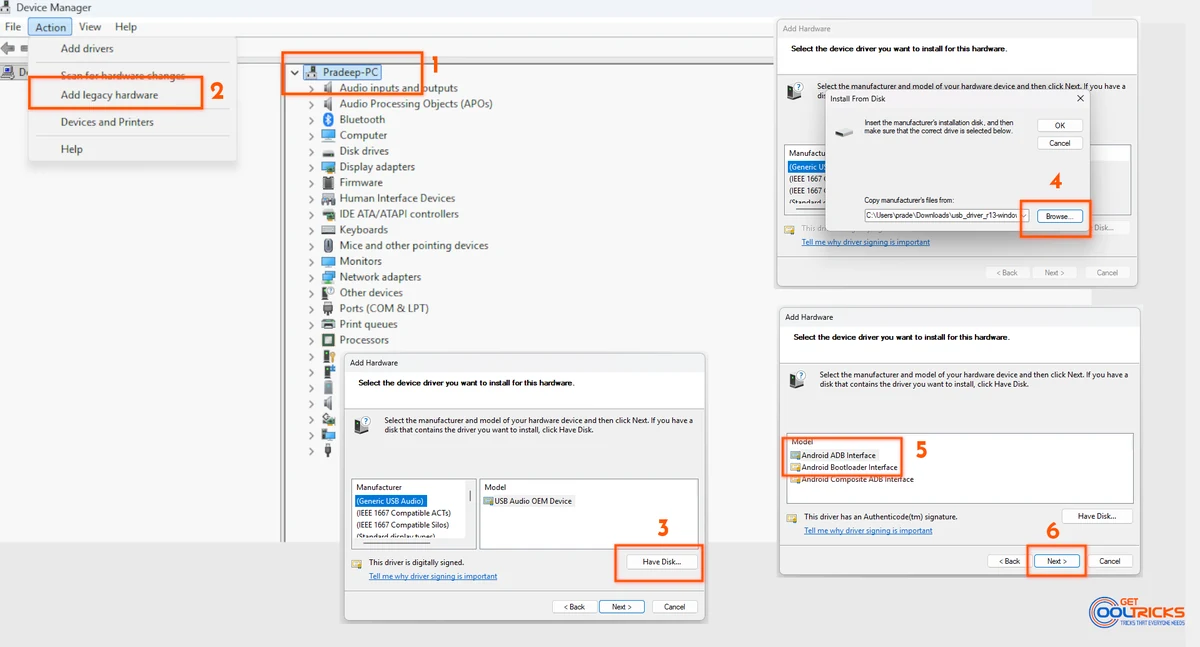
Step 2: Add Legacy Hardware
- Click Action → Add legacy hardware
- Click Next
- Choose:
Install the hardware that I manually select from a list - Select Show All Devices
- Click Have Disk
- Browse and select the
.inffile - Complete the installation
You might need to restart your system after this. Check the screenshot below for reference.
Troubleshooting
If Windows Blocks the Driver
You’ll need to disable Driver Signature Enforcement before installing.
If Installation Fails
- Double-check the folder structure
- Remove old versions, if any
- Restart your system
If the device still doesn’t work
- Try a different USB port
- Use another cable
- Make sure USB debugging is enabled
Even though most devices today install automatically, legacy drivers still come up occasionally, especially with older hardware or development tools. In most cases, updating the driver through Device Manager is enough. If not, the “Add Legacy Hardware” option gives you a fallback. Once you get used to it, the process is actually pretty straightforward.