Sharing your internet from a laptop or desktop can be really useful, especially when your router isn’t nearby or you want to connect multiple devices quickly. On modern systems like Windows 10 and Windows 11, this can be done easily using the built-in Mobile Hotspot feature, without installing any third-party apps.
What You Need
Before you start, make sure you have:
- A Windows laptop or desktop with a WiFi adapter
- An active internet connection (Ethernet or WiFi)
- A device to connect (phone, tablet, or another laptop)
Most laptops already have WiFi built in. If you’re using a desktop, you may need a USB WiFi adapter.
How to Create a Mobile Hotspot
Follow these steps:
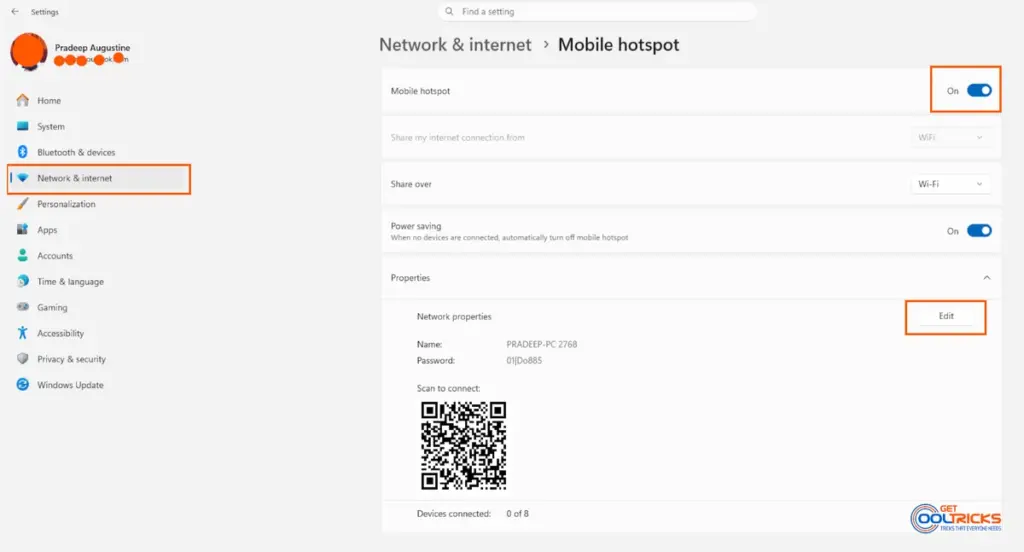
- Click Start and open Settings
- Go to Network & Internet
- Select Mobile hotspot
Now configure your hotspot:
- Choose which connection you want to share (WiFi or Ethernet)
- Click Edit
- Set a network name and password
After that:
- Turn on the mobile hotspot
Connect Your Devices
On your phone or another device:
- Turn on WiFi
- Look for the hotspot name you created
- Enter the password and connect
Once connected, your device will start using your computer’s internet.
Things to Know
- Windows allows up to 8 connected devices at a time
- You can see connected devices in hotspot settings
- Speed depends on your main internet connection
- Sharing WiFi over WiFi may slightly reduce performance
- If you don’t see the Mobile hotspot option, your device may not support it, or the WiFi adapter driver might need an update.
Common Issues and Fixes
If the hotspot is not working:
- Check if your WiFi adapter supports hotspot
- Update network drivers
- Turn the hotspot off and on again
- Restart your computer
If your phone cannot find the hotspot, try switching the band (2.4 GHz / 5 GHz).
Final Thoughts
Creating a mobile hotspot on Windows is simple and reliable. Since it’s built into the system, you don’t have to depend on third-party tools anymore.
If you often need to share your internet, this is one feature worth using.