.NET Framework 3.5 is required by many older applications and tools. While modern Windows versions come with newer frameworks installed by default, some software still depends on .NET Framework 3.5 (which includes .NET 2.0 and 3.0).
This guide works for Windows 8, Windows 10 and Windows 11, and shows both the easiest method and the offline installation method using a Windows ISO file.
What Is .NET Framework 3.5?
.NET Framework is a software framework developed by Microsoft that allows applications to run on Windows.
.NET Framework 3.5 includes:
- .NET 2.0
- .NET 3.0
- .NET 3.5
Many legacy applications rely on these components to function properly.
Method 1: Enable .NET Framework 3.5 Using Windows Features (Recommended)
This is the easiest method if you have an internet connection.
Option 1: Using Settings (Windows 11 Recommended)
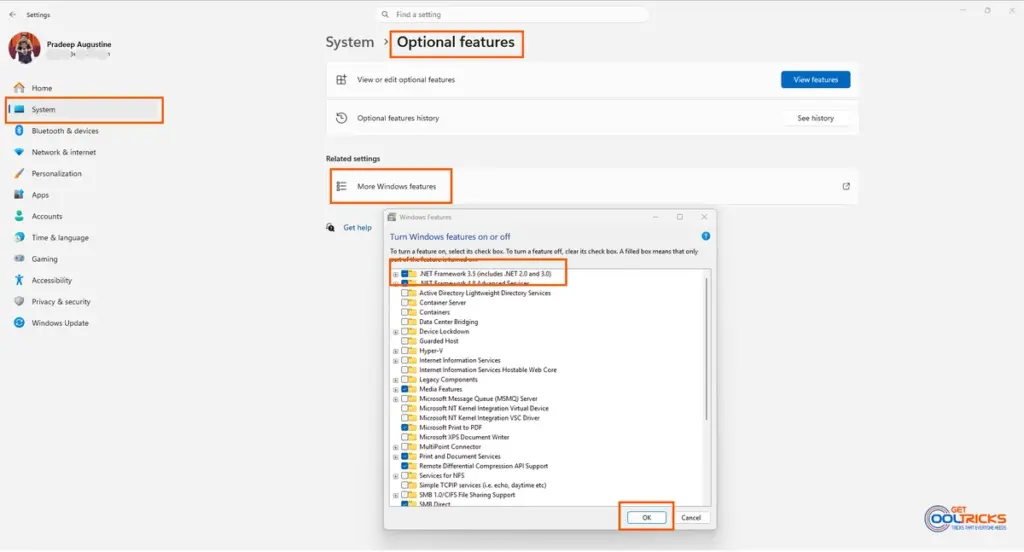
- Open Settings
- Go to System → Optional features
- Click More Windows features
- In the window that opens, check:
.NET Framework 3.5 (includes .NET 2.0 and 3.0) - Click OK
- Let Windows install the required files
Option 2: Using Search
- Click on Start
- Search for:
Windows Features - Click:
Turn Windows features on or off - Check:
.NET Framework 3.5 (includes .NET 2.0 and 3.0) - Click OK
- Let Windows download and install the required files
Option 3: Using Run Command
- Press Win + R
- Type:
optionalfeatures- Press Enter
- Enable:
.NET Framework 3.5 (includes .NET 2.0 and 3.0) - Click OK
Option 4: Using Control Panel (Legacy Method)
Click OK
Open Control Panel
Go to Programs → Turn Windows features on or off
Enable:
.NET Framework 3.5 (includes .NET 2.0 and 3.0)
Method 2: Install .NET Framework 3.5 Offline (Using DISM)
Use this method if:
- You don’t have internet access
- Windows Update is disabled
- Installation fails using Method 1
Requirements
- Windows ISO file (same version as your system)
- Administrator access
If you don’t have the ISO file, you can follow our guide to download the official Windows 11 ISO file.
Steps
1. Mount the Windows ISO
- Right-click the ISO file
- Click Mount
- Note the drive letter (for example,
D:)
2. Open Command Prompt as Administrator
- Search for cmd
- Right-click → Run as administrator
3. Run the DISM Command
Dism /Online /Enable-Feature /FeatureName:NetFx3 /All /Source:D:\sources\sxs /LimitAccessReplace D: with your mounted ISO drive letter.
4. Wait for Installation
- The process may take 10–20 minutes
- Once completed, .NET Framework 3.5 will be enabled
Important Notes
- The ISO version must match your Windows version
- Do not close the command prompt during installation
- This method works for both Windows 10 and Windows 11
Troubleshooting Tips
- Make sure the
sources\sxsfolder exists in the mounted ISO - Run Command Prompt as administrator
- Check for typing errors in the command
When Do You Need .NET Framework 3.5?
You may need it when:
- Running older software
- Installing legacy applications
- Using tools that depend on older Windows components
Final Thoughts
.NET Framework 3.5 is still required by many applications, even on modern Windows systems. Enabling it using Windows Features is the easiest method, while the DISM method provides a reliable offline solution when needed.