
Almost all the hosting providers have their way of delivering WordPress to their users. They call it a one-click installation of WordPress. Your blog will be ready at a click of a button. Some hosting providers make use of third-party services like Softaculous, to deliver WordPress and other CMS software to their customers. You may not need the auto installation if you are moving your blog from a different host or what if your host doesn’t support Auto installation?
In that case, you need to install WordPress manually. In one of our tutorials, we explained the procedure to run a web server on your PC using WAMP. If you are new to WordPress try to install WordPress locally in the WAMP server and then proceed with the installation on your live server. Read these tutorials and make yourself familiar before trying the installation on your live server. Let us see the installation steps in detail.
Preparing WordPress core files
Download the latest build of WordPress from the official site (Download Link). It is time to upload the files to your server. Some servers support zip file upload and extraction. In such a case, you can upload the downloaded zip file directly into your server and extract the core files to the root directory of your domain. If your host does not support zip file extraction, fire up your FTP client and upload the extracted files to the root directory of the server. Now, your core files are ready. If you are running it on a local server, you don’t need to link a domain name.
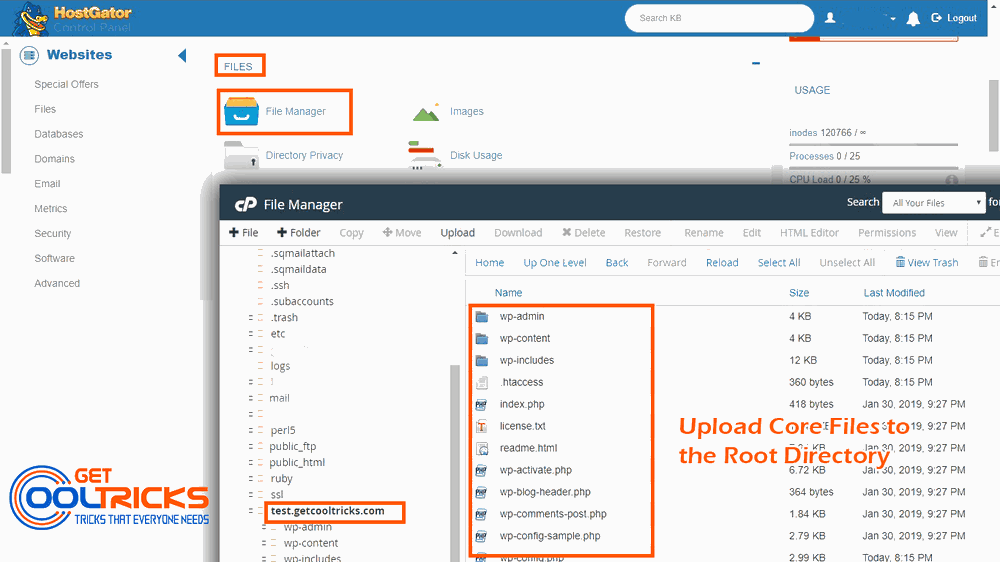
However, on a live server, you need to add a domain name to the server first to proceed with the installation. Some hosts provide a temporary URL until you link your domain. You can use the temporary URL to proceed with the installation. Our demonstration will be on Hostgator Cpanel. Steps may differ, depending on the hosting provider. On Hostgator Cpanel, navigate to the Files section and click File Manager. Upload the files to the root directory of the domain. Check the screenshot for details.
Creating a database and database user
WordPress makes use of a database to store files. The most widely used open-source database is MySQL. Every hosting provider gives different methods for its users, to create a new database. Some hosts allow you to create a database directly from PHPMyAdmin, some don’t. We have explained how the database is created in the PHPMyAdmin on our tutorial, WordPress on WAMP Server. Popular hosting providers like Hostgator, Bluehost, etc, have a database wizard, which will take you through a step-by-step wizard to create a database. Create a database by following the preferred method.
Once the database creation is over, you need to create a database user with all the privileges to the database. Create a database user and note down the username and password safely. These details are needed during the installation of WordPress. If your host uses Cpanel for the hosting management, then the following steps are going to be similar. The screenshots used in this tutorial are captured on HostGator’s database wizard. Let us see the steps in detail.
The Database Wizard
Login to your Cpanel. Scroll down to the databases section and click the MySQL® Database Wizard. In the first step enter a name for your database and click the Next Step button. The second step in the database wizard is database user creation. Enter the user name and choose a strong password. Note down the user name and password which are required during the installation of WordPress. After entering the details, click Create User button. In the third step, link the newly created user to the database. Click the all privileges checkbox and click the Next step button. Now the database is ready to be linked with WordPress. Check the following screenshot for details.

Installing WordPress
It is time to Install WordPress. Open your favorite browser and enter the following URL.
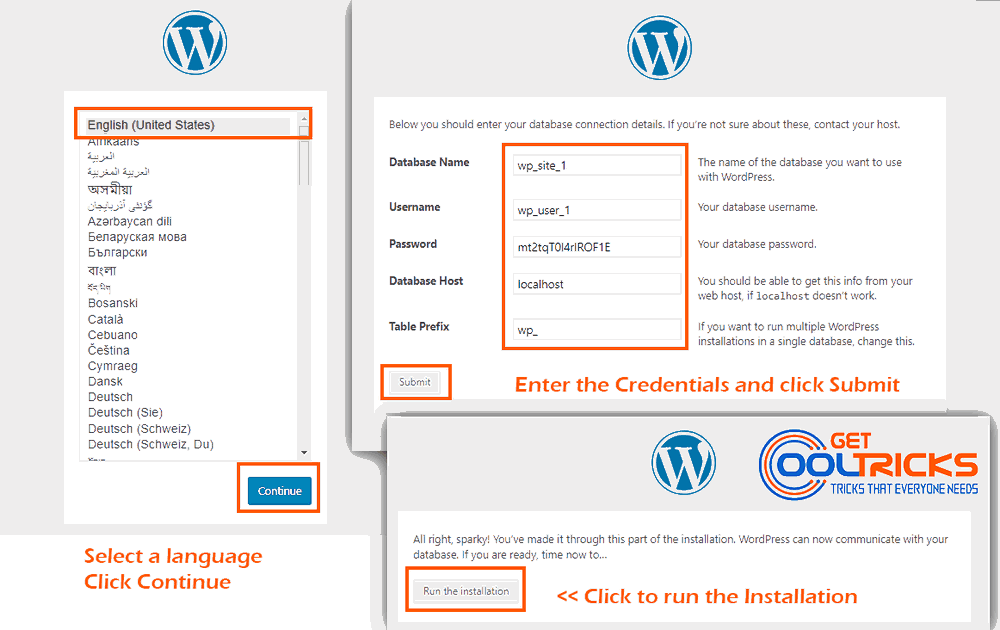
http://yoursiteurl.com/wp-admin/install.phpI’m installing WordPress on a sub-domain test.getcooltricks.com. So the installation URL becomes “http://test.getcooltricks.com/wp-admin/install.php”. When you access the URL, the language selection page occurs. Select your language and click Continue. Since this is a fresh installation, a welcome screen occurs, showing the requirements to install WordPress. Since we already have created the database and its user, click the “Let’s go!” button. A new page appears, asking you to enter the Database Name, User Name, Password, etc. Fill in the details acquired during the database creation. Change the database prefix if needed and then click Submit. Check the screenshot for details.
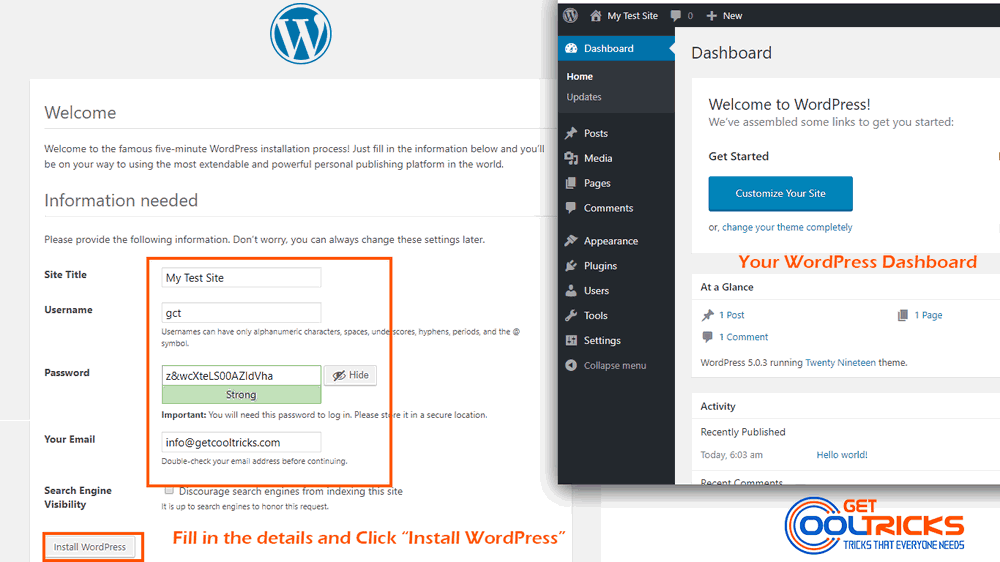
If all the details entered by you are correct, a page occurs with the ‘Run the Installation’ button. Click the button to begin the installation. It may take about 5 minutes for the installation to complete. You will be shown the page which requests the Site title, User Name Password, Recovery Email, etc. Enter all the details and click install WordPress. You will be taken to the new WordPress Dashboard once the installation completes without error. From there, you can start building your Website. Check the screenshot below for details.
Setting up WordPress
The default Permalink of WordPress is not SEO friendly. We prefer you to change it to something easily understandable. To change the permalink structure check our tutorial on Changing the Permalink Structure in WordPress. WordPress search is not so powerful. To replace the WordPress default search with Google Custom Search, Check our tutorial on replacing WordPress Search with Google Custom Search.
Other People are reading
- How to install WordPress on the WAMP server
- Backup WordPress Blog Remotely on Google Drive
- How to Create Google Ad unit and use it on the website
You have now learned to install WordPress on your web server. Hope you liked it. Leave your valuable suggestion and feedback in the comment box below.