Backing up your WordPress website to cloud storage ensures your data is safe in case of hacking, server issues, or accidental mistakes. UpdraftPlus allows you to store backups in remote storage providers such as Google Drive, Dropbox, Amazon S3, FTP, and many others.
In this guide, Google Drive is used as an example. The connection steps may vary slightly depending on the provider you select.
Step 1: Install UpdraftPlus
- Go to Plugins → Add New
- Search for UpdraftPlus
- Click Install Now
- Click Activate
After activation, go to:
Settings → UpdraftPlus Backups
You will see tabs such as:
- Backup / Restore
- Migrate / Clone
- Settings
- Advanced Tools
Step 2: Configure Backup Schedule
Open the Settings tab.
You will see two important options:
Files backup schedule
Choose how often files should be backed up (Daily, Weekly, Monthly, etc.).
Database backup schedule
Choose how often the database should be backed up.
You can also select how many backups to retain.
For example, if you choose 2, the plugin will automatically delete older backups beyond that limit.
Set these according to your website activity level.
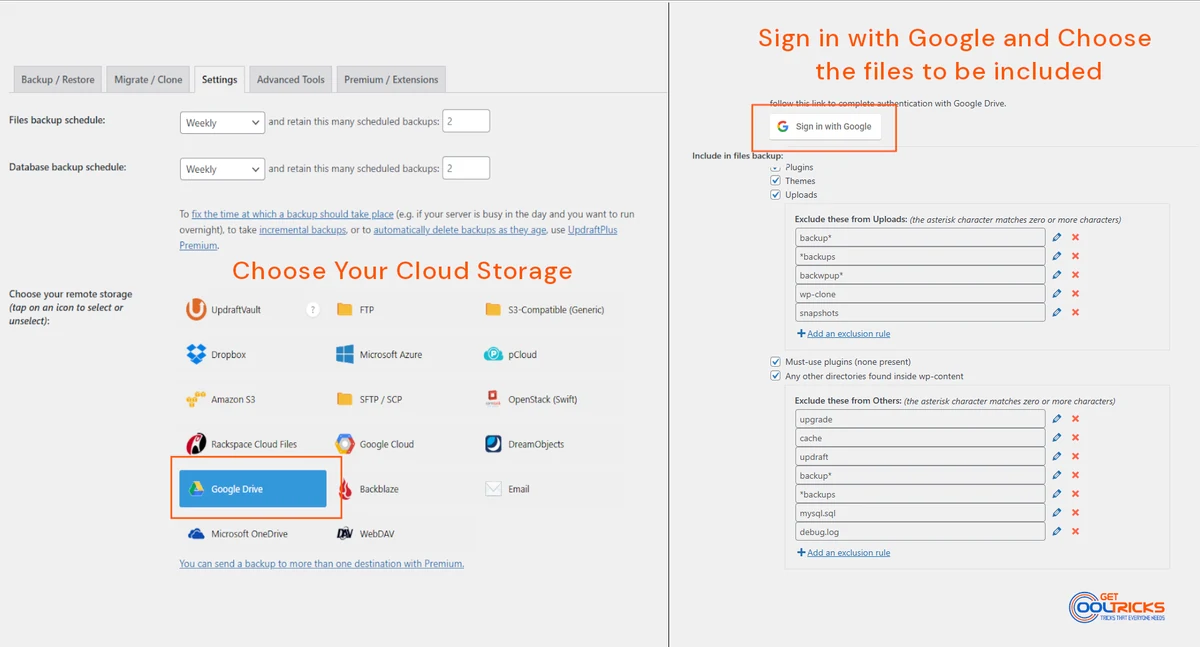
Step 3: Choose Remote Storage
Scroll down to Choose your remote storage.
You will see multiple options including:
- Google Drive
- Dropbox
- Amazon S3
- FTP / SFTP
- Microsoft OneDrive
- Backblaze
- And others
Click the storage provider you want to use.
In this tutorial, we select Google Drive.
Click Save Changes.
Step 4: Connect Your Storage Account
After saving, UpdraftPlus will display connection instructions.
For Google Drive:
- Click the Sign in with Google button.
- Log in to your Google account.
- Click Allow to grant access.
For other providers:
- You may need to enter API keys
- Or server credentials
- Or authorize using a similar login process
Follow the on-screen instructions carefully.
Once successful, your site will be connected to the selected cloud storage.
Step 5: Configure File Inclusion and Exclusion (Optional)
In the Settings page, you can choose what to include:
- Plugins
- Themes
- Uploads
- Must-use plugins
- Other wp-content folders
You will also see exclusion rules such as:
- backup*
- cache
- upgrade
- debug.log
These prevent unnecessary files from being included in backups.
You can add custom exclusion rules if needed.
Step 6: Run a Manual Backup
Now go to the Backup / Restore tab.
Click the Backup Now button.
A popup will appear asking whether to include:
- Files
- Database
Keep both selected and confirm.
The backup process will begin. The time required depends on your site size.
You can monitor the progress in the log message area.

Step 7: View and Restore Existing Backups
Once completed, scroll down to the Existing Backups section.
You will see:
- Backup date
- Database
- Plugins
- Themes
- Uploads
- Others
You can:
- Download individual components
- Restore the backup
- Delete old backups
- View logs
To restore:
- Click Restore
- Select components
- Confirm
The plugin will automatically download the backup from your remote storage and restore your site.
Important Recommendations
- Always test a backup at least once to ensure it works.
- Do not rely only on local backups.
- Set a proper retention limit to avoid consuming excess storage.
- Monitor your Google Drive storage usage.
Final Thoughts
UpdraftPlus makes backing up WordPress to cloud storage simple and reliable. Whether you choose Google Drive, Dropbox, or another provider, the process follows the same basic workflow: Schedule → Connect Storage → Backup → Restore.
Keeping regular backups is one of the most important steps in maintaining a secure and stable WordPress website.