What to do next once your Google AdSense application got approved? If you want to make money online with your online content, AdSense is the best option. Here is the simplest tutorial to create Ad units in Google AdSense and use it effectively on your website or blog to make money. Google AdSense is the world’s most used Ad network that is used by almost all webmasters to Monetize their websites in the beginning.
Latest Update: Google had released its new Auto Ad format that can intelligently place the ads for the better performance of Google ads. Tutorial link: Create and implement Auto ad unit.
Due to the increasing trend in the use of responsive web design, Google has released its responsive ad units that fit the width of the parent container automatically. You can also manually set the width for the different device by using Google’s approved modification to the responsive ad code. Responsive web design is now an SEO factor that decides the rank of your website. So using a responsive ad unit is officially recommended by Google. AdSense ad units are mostly filled by Google AdWords Campaign which pays more when compared to other ad network partners of Google.
About Adsense
Google AdSense account can monetize your online content in different ways. You can use 3 AdSense for Content ads and 3 link units on a page. Google has lifted the 3 unit restrictions. As long as your ads do not exceed your content, there is no upper limit on the number of ads on a single page. You can also increase the income by using the AdSense for search on the search page that uses Google Custom Search Engine. If you have a WordPress blog you may like my tutorial on Replacing Default search with Google Custom Search in WordPress. You can also monetize your YouTube videos using the same account. Publishers can link their AdSense account to any web analytics tool to monitor the performance of the ads. Google Analytics is the well know web analytics platform.
Update: Google has lifted the limit restrictions. As long as your ads do not exceed your content, there is no upper limit on the number of ads on a single page. Google now offers three additional Ad formats, Matched content Ads, In-Article ads, and In-Feed Ads. Matched content is not allowed on all the Websites. The approval of the Matched Content ads depends on the quality and the volume of traffic your site receives.
The new ad Units In-Article and In-Feed comes with the fluid layout. As the name indicates, these ad units are meant to be used inside the article (Posts and Pages on WordPress) and on the feed (Archive pages on WordPress). Even though it comes with limited options, it fits well and adapts all screen perfectly. GetCoolTricks.com uses these ads and found these ads performing well on all the devices. Give a try on these new ad units.
Creating a fixed size AdSense ad unit
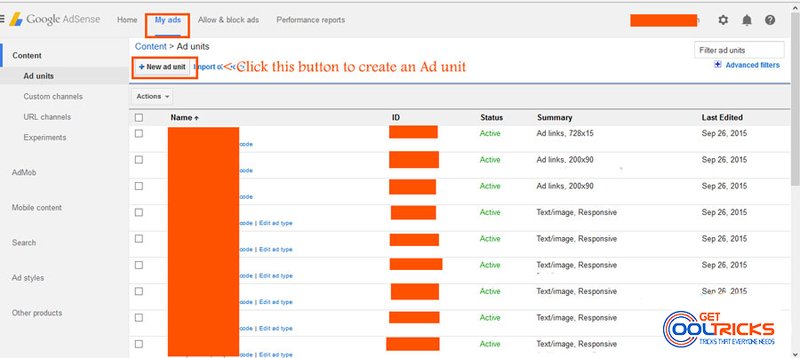
Log in to your AdSense account using the Google account. Navigate to the ‘My ads’ tab from the top menu and click ‘New ad unit’ button at the top as shown.
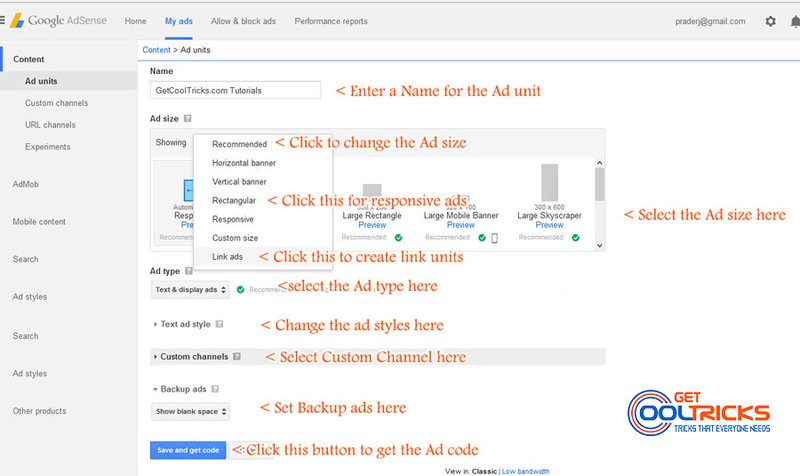
In the page that appears, enter a name for the ad unit and select the ad size as required. For better results use the recommended ad size. Select the required ‘Ad size’ either from the recommended list shown or select from the drop-down. Set the Ad type to text and Display ads for better ad serving. Change the color of the links, text, etc. for the text ad to match it with the website content. Use the channel feature if you want to enable placement targeting for your ads. Set the backup ads if you wish. Now click ‘save and get code’ button at the bottom. Use the code obtained here to show ads on the website.
Creating a responsive AdSense ad unit
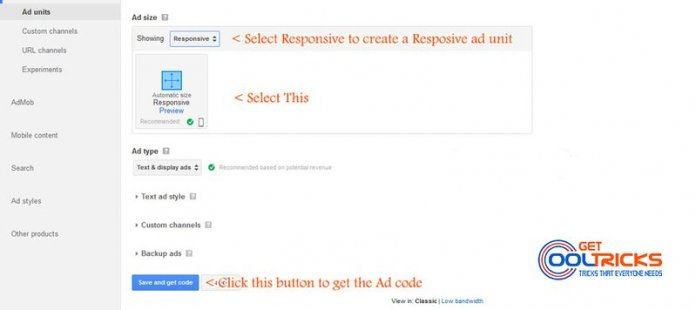
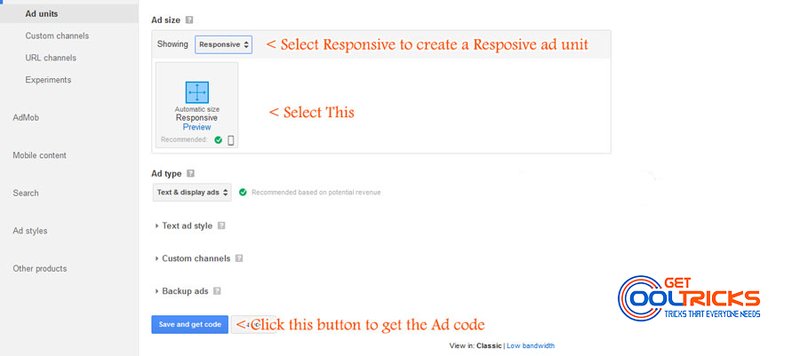
Navigate to the ‘My ads’ tab from the top menu and click ‘New ad unit’ button at the top. In the page that appears, enter a name for the ad unit and select responsive in the ad size. Other steps are same as mentioned above.
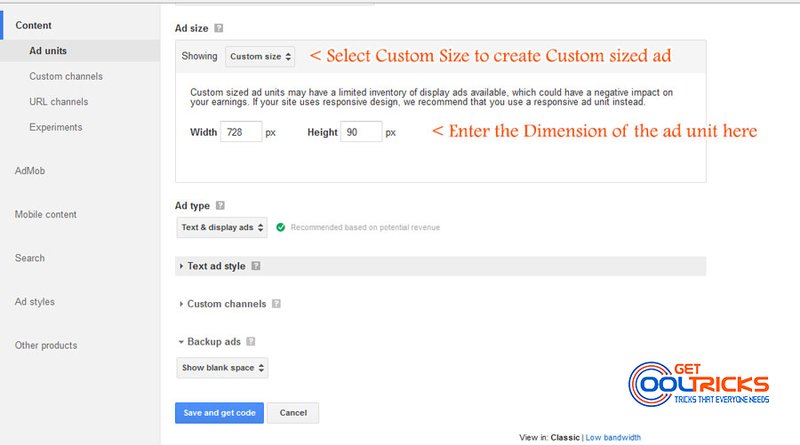
Creating a custom sized Ad unit
If you want a custom sized AdSense ad, select ‘custom sized’ ad from the drop-down in the Ad size tab and enter the width and height as required. For details check the image shown here.
Adding the AdSense Code to the website
The code for the ad unit will be displayed in a small pop-up once you click the save button. Copy that code and paste it into your website HTML, where you want to show the ads. If your blog or website is powered by WordPress you can simply add it to the sidebar using the text widget in widgets tab. If you have a blog running in blogger, you can add it to the sidebar using Text gadget. For detailed instruction to add a gadget in blogger check my tutorial on adding widgets or gadgets to blogger blog. You are done.
Why do Publishers prefer AdSense?
This is the basic question that most of the new bloggers ask. Why Google AdSense? The answer is very simple. Google AdSense is the World’s most used Advertisement Placement service that pays more for the Publishers when comparing to other ad networks. Publishers can display up to 3 ads per page in their online content once they get the AdSense approval. These Ad units are automatically filled with ads that are mostly from the Google AdWords campaign manager, which is part of Google’s online Advertising program. The Cost per click of the ads increases when a lot of these Advertisers are targeting their ads on your site. The final result is that you will see more relevant ads on your website, which improves the click-through rate and cost per click for the ads.
Other people are reading
- Download YouTube Videos without using Software
- Backing up WordPress blog remotely on Google Drive
- Google Custom Search Engine for your WordPress Blog
- Creating a Google Custom Search Engine

