If your Windows 11 PC feels slow, freezes randomly, or shows 100% disk usage in Task Manager, you’re definitely not alone. This is a fairly common issue, especially on systems that have been running for a while or just received an update.
The good part is, you usually don’t need to reinstall Windows or use any risky “fix” tools. In most cases, a few simple adjustments can bring things back to normal. Let’s go through them step by step.
Who this guide is for
This guide will help if:
- Task Manager shows Disk usage at 90–100%
- Apps take longer than usual to open
- The system becomes sluggish during startup
- You’re using an HDD or an entry-level SSD
All the steps given below are safe, and you can revert them if needed.
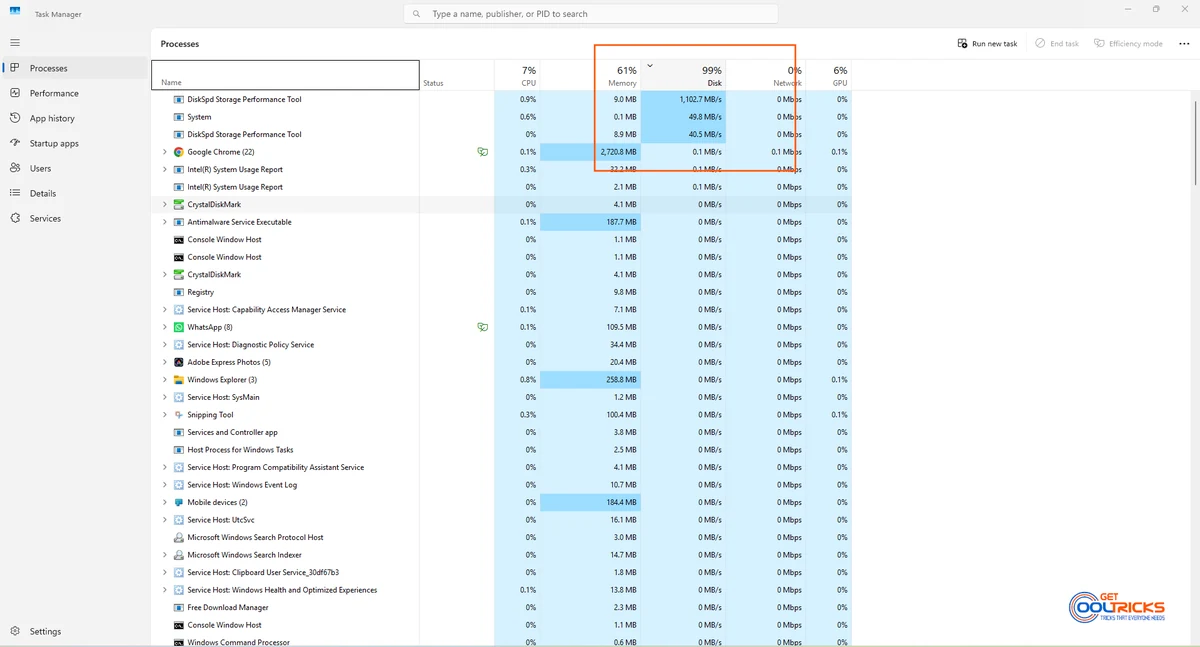
Step 1: Identify what’s using the disk
Before trying any fixes, it’s worth checking what’s actually causing the problem.
- Press Ctrl + Shift + Esc to open Task Manager
- Click More details
- Go to the Processes tab
- Click the Disk column to sort usage
Take a quick look at which apps or services are using the disk heavily. This gives you a better idea of what to fix instead of guessing.
Step 2: Disable unnecessary startup apps
If too many apps start with Windows, the disk can stay busy even when you’re not doing anything.
- Open Task Manager
- Go to the Startup apps tab
- Disable apps you don’t really need at startup
Things like updaters, launchers, and chat apps are usually safe to disable.
Try not to disable:
- Drivers
- Antivirus software
- System-related processes
This alone can make a noticeable difference after boot.
Step 3: Check disk health and file system errors
Sometimes the issue is not an app, but the disk itself, trying to fix errors repeatedly.
Run Check Disk
- Open Command Prompt as Administrator
- Run: chkdsk C: /f
- Restart your PC if prompted
This will scan and fix common file system issues.
If you’re using an SSD, don’t worry about “bad sector repair” tools — SSDs handle storage differently.
Step 4: Reduce Windows background activity
Some Windows services run constantly in the background and can cause disk spikes.
Test by disabling SysMain
- Press Win + R, type
services.msc - Find SysMain
- Stop the service
- Set Startup type to Disabled
- Restart your system
Use your PC for a while and see if things improve. If it helps, you can leave it disabled.
Step 5: Check Windows Search indexing
Search indexing is useful, but on slower systems, it can keep the disk busy.
To reduce its impact:
- Go to Settings → Privacy & security → Searching Windows
- Switch to Classic
- Exclude folders you don’t search often
This reduces unnecessary background activity.
Step 6: Make sure Windows is updated properly
Sometimes the issue is just a stuck or incomplete update.
- Go to Settings → Windows Update
- Install any pending updates
- Restart your system
If updates keep failing, it’s better to fix that first before trying deeper tweaks.
Step 7: Scan for malware (important)
Malware can quietly use disk resources without obvious signs.
- Open Windows Security
- Run a Full scan
Avoid installing random “optimizer” tools — Windows Defender is usually enough.
HDD vs SSD: an important reality check
A quick reality check:
- HDD systems are more likely to hit high disk usage
- SSD systems usually handle this much better
If you’re still on an HDD, upgrading to an SSD can make a huge difference. In many cases, it’s the biggest performance boost you can get.
What NOT to do
A few things are better avoided:
- Installing “disk booster” software
- Disabling random services without understanding them
- Using registry cleaners
- Reinstalling Windows as the first step
These often make things worse instead of fixing the issue.
Final Thoughts
High disk usage can be frustrating, but it’s usually fixable with a bit of patience. Try the steps one at a time and see what works for your system. Don’t worry if one fix doesn’t solve everything immediately. Sometimes it takes a combination of small changes. If you’re unsure about a setting, just note it down before changing it so you can revert it later.
In most cases, you should see a noticeable improvement without doing anything drastic.