Most hosting providers offer one-click WordPress installation using tools like Softaculous. However, there are situations where you may need to install WordPress manually:
- Your hosting does not support auto installers
- You are migrating from another host
- You want full control over the installation
If you are new to WordPress, it’s a good idea to first try installing it locally before working on a live server. You can follow our guide on installing WordPress on WampServer to understand the basics before proceeding.
Step 1: Download WordPress
Download the latest version of WordPress from the official website.
Once downloaded:
- You will get a
.zipfile - This contains all the core WordPress files
Step 2: Upload WordPress Files to Your Server
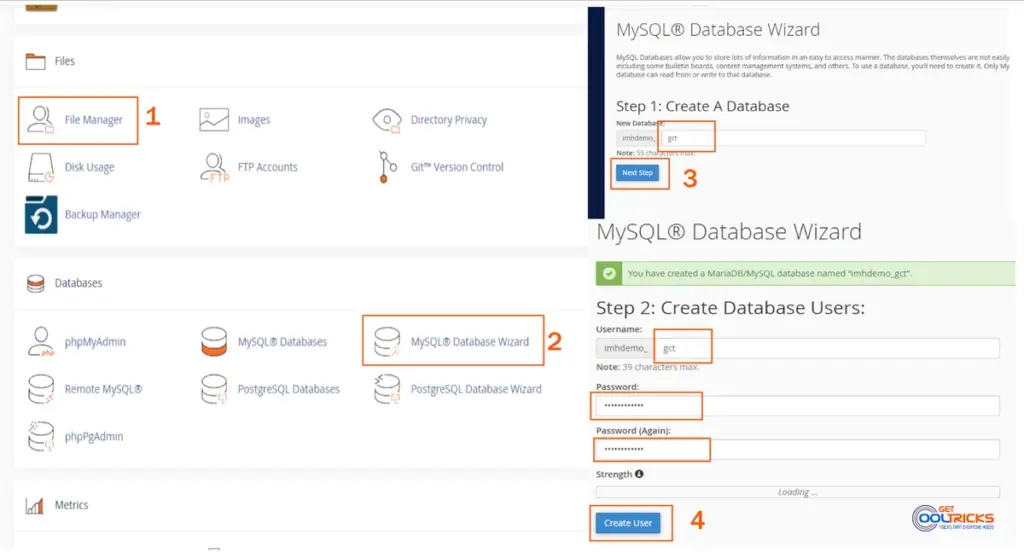
- Log in to your cPanel
- Go to File Manager
- Navigate to your domain root directory:
public_html(main domain)- Or a subfolder/subdomain
Upload Options
Option A (Recommended):
- Upload the
.zipfile - Extract it inside the root directory
Option B:
- Extract locally
- Upload using FTP (like FileZilla)
After extraction, ensure files are directly inside the root folder (not inside a nested wordpress folder unless intended).
Step 3: Create a Database
WordPress requires a MySQL database.
Using cPanel Database Wizard:
- Go to MySQL® Database Wizard
- Enter a database name → Click Next
- Create a database user
- Use a strong password
- Assign the user to the database
- Select All Privileges
- Finish setup
Save these details:
- Database Name
- Username
- Password
If you are setting up WordPress on a local server instead of cPanel, the database creation process will be slightly different. You can refer to our WampServer guide for local setup instructions.
Step 4: Start WordPress Installation
Open your browser and visit:
http://yourdomain.com/wp-admin/install.php
If installed in a subfolder:
http://yourdomain.com/folder/wp-admin/install.php
Step 5: Configure Database Connection
- Select your language → Click Continue
- Click Let’s Go
- Enter database details:
- Database Name
- Username
- Password
- Database Host:
localhost - Table Prefix (optional)
Click Submit
If the details are correct, proceed to the next step.
Step 6: Complete Installation
Click Run the Installation
Now enter:
- Site Title
- Admin Username
- Password
- Email Address
Click Install WordPress
Once completed, you’ll be redirected to the login page.
Step 7: Log in to WordPress
Access your dashboard:
http://yourdomain.com/wp-admin
Log in using your admin credentials.
Your WordPress site is now ready.
Recommended Settings After Installation
Change Permalink Structure
After installation, it is recommended to update your permalink structure for better SEO.
Go to:
Settings → Permalinks
Select:
Post Name
If you are unsure how to configure this properly, check our guide on changing the permalink structure in WordPress.
Important Tips
- Make sure your domain is properly pointed to the server
- Ensure file permissions are correctly set (usually handled automatically)
- Always use strong database and admin passwords
If you are migrating your website from another host, always take a full backup before making changes. You can follow our guide on backing up WordPress to cloud storage using UpdraftPlus.
Final Thoughts
Manual WordPress installation in cPanel is straightforward and gives you full control over your setup. While one-click installers are convenient, understanding the manual process helps in troubleshooting, migration, and advanced configurations.
With proper setup, backups, and basic configuration, your WordPress site will be ready for development and deployment.