
This simple tutorial helps to enable or disable the automatic updates in Microsoft office 2016. Since Office 2019 come with the similar user interface, the steps are going to be similar. It is not recommended to turn off the automatic updates as they are released with security patches and help the system to run smoothly. If you are on a metered connection or a PC with the minimal configuration, you may need to turn off the Microsoft Office updates for the lag-free performance. Let us see the steps to disable the Office updates on a Windows 10 PC. My system runs the latest version of Windows 10 Home. If you are on an older version of Windows 10, you may see different UI and settings.
Step 1: Disabling the Microsoft product updates in Windows Update
Microsoft pushes product updates automatically through Windows updates if you are running genuine Microsoft products in your PC. To stop Windows update from downloading product updates, Go into the Settings > Update and Security > Windows Update > Advanced Options. Turn of the Toggle Switch that says “Give me updates for other Microsoft products when I update Windows.” Once the option is disabled Windows update stops looking for the product updates. Check the following Screenshot for reference.

Step 2: Disabling the automatic updates in Microsoft Office Products
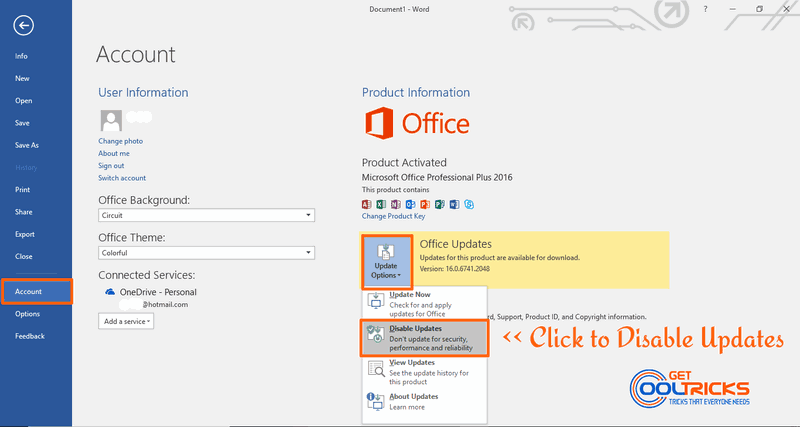
This step will disable the Office updates (Disables Microsoft Office ClicktoRun Updates). Once the Microsoft product update is turned off in the Windows update, open any of the office products, say Microsoft Office Word or Excel. Goto File and access Account tab from the side menu. Click on the Update Options and Select Disable Updates. A User Account Control Window Pops up asking your permission. Click ‘Yes’ in the Window to disable the Updates. Check the Following Screenshot for reference.
Turning on Automatic Updates again
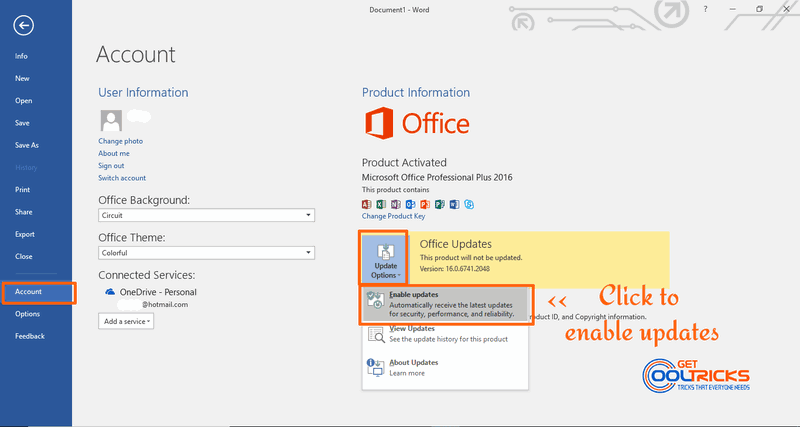
To turn on the updates again, undo all the settings you have changed. Goto Files > Account > Update Options > Enable Updates. A User Account Control Window pops up. Select Yes to enable the updates again. If updates are available, you can select “Update Now” in the Update Options to update Office instantly. Check the screenshot provided below for reference.
Other People are reading
- How to fix language pack not downloading on Windows 10
- Upgrade your computer to Windows 10 Using Media Creation Tool
- How to Optimize Windows Startup
You have now learned to disable and enable the Microsoft Office product updates. Kindly leave your feedback and valuable suggestions in the comment box below.