
Since Android 5.0, people can take the RAW photo with Android mobile phones, some of them at least. The combination of RAW + JPEG gives mobile users more choices to capture pictures for various purposes. If you are not quite clear about the benefit of the RAW file, check this article. In this tutorial, we are going to show how to take the RAW photo with an Android mobile phone and related tips & tricks.
Mobile Phones That Can Take RAW Photo
The following devices are reported to be able to take RAW photos, but the list definitely does not end. Please test your device by yourself.
- Google Pixel
- HTC One A9, HTC One M9, HTC Bolt, HTC 10
- LG G4, LG G5, LG V10
- Nexus 5X, Nexus 6P
- OnePlus 2, OnePlus X, OnePlus 3
- Samsung Galaxy Note5, Samsung Galaxy S6/S7/S8/S9
- Apple iPhone 6s Plus, iPhone 7, iPhone 8
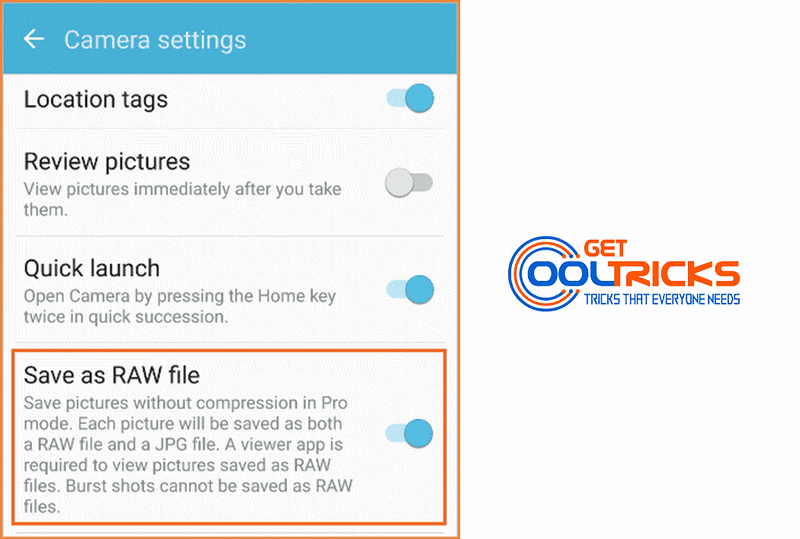
How to Take RAW Photo with Samsung Galaxy
Let’s take Samsung Galaxy S7 as an example.
- Launch the camera app, tap MODE on the left, then choose Pro from the options.
- Tap the Settings icon in the top-left corner.
- Toggle to enable Save as a RAW file.
- Take photos in Pro mode with your smartphone.
Where Are RAW Images Saved on Your Phone
RAW images are usually stored in phone internal memory: DCIM > Camera. This won’t change even if you set the storage location as an SD card in the camera app, mainly because the system opts to make sure it can save and access the RAW image at high speed. It worth mentioning that the JPG images you take in Pro mode will be saved in the default folder in internal memory too, but other than that, the JPGs will go to the external location you set.
How to Save RAW Photos to SD Card
If you really want to save RAW files to an SD card, there are actually several methods.
- Use third-party camera apps, like Open Camera, which will apply custom storage location to RAW files too.
- Format SD card as internal memory, which works for Android 6.0 and later. Please search for guides for your device on Google, and don’t put them into action until you know all the pros and cons.
- Move RAW photos to SD card manually, which will also work as backups in the future.
Other People are reading
- How to run multiple accounts of the same App on Android phone
- How to download YouTube videos on Android Device
- Remove Google Account on your smartphone before selling it
- How to Recover Deleted Data from Android Device
Now you should know how to take RAW images with an Android mobile phone. If you have any problem with your smartphone, please tell us your phone model so that we can have a discussion.
The benefit of raw photos is that it contains most of the information from the camera such as sharpness and contrast without the compressing. So the given procedure to take a raw photo from the phone is very efficient and nicely explained.