
This is the simple tutorial that will walk you through the step by step instructions to record better audios using a USB microphone on your Android Smartphone. This will be helpful for the people who record audios for their podcast using their Smartphone. We cannot carry our computer to record professional quality audios wherever we go. Smartphones are really helpful in this case. For illustration, I’m using the Samson Go Mic which is tiny and fits in my pocket. It is a simple looking, highly durable, good quality microphone by Samson. You can also use other USB audio interface devices like Blue Yeti, Audio Technica, etc. I prefer Blue Microphones as they deliver high-quality recordings when comparing its competitor. Let us see the steps in detail.
Requirements
- An Android Smartphone
- USB OTG Cable
- Any supported USB microphone (I have found Blue Yeti and Samson Go Mic works perfectly with the Android Smartphone)
- USB Audio Recorder App from the Play Store (Link).
About USB Audio Recorder
There are many other USB Audio Recorder App available in the Play store. However, I personally find this app better than any other app in the Play Store. This App records good quality audio and store it on the Android File System as ‘.wav‘ file format. The recordings are saved in a folder named “recordings“, on the external storage card. This works well on the smartphones running Android 3.1 and up. This free App has a limitation of 50MB file size. If you really like this software, you can buy the pro version of this App by paying a little price. This app comes with a very simple UI and does not require any technical skills to use it.
Using USB Audio Recorder
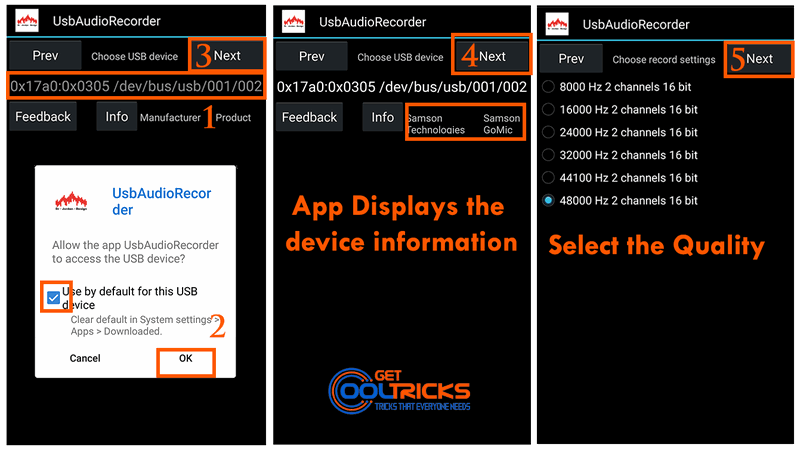
Install the USB Audio Recorder app from play store. Connect the USB Microphone to your smartphone using the USB OTG cable and open the app. In the ‘Choose USB device’ screen, tap on the location on which the USB microphone is mounted. A pop-up appears asking your permission to access the USB device. click the checkbox to use this option by default for that USB device and Click ‘Ok‘. The App now shows the USB mic manufacturer and model. Tap ‘Next‘ on the top right corner of the App. In the next screen, you can choose the recording settings. This screen shows the list of compatible recording settings that your USB microphone is capable of. Select the quality in this screen and click ‘Next‘. Check the Screenshot Provided below for details.
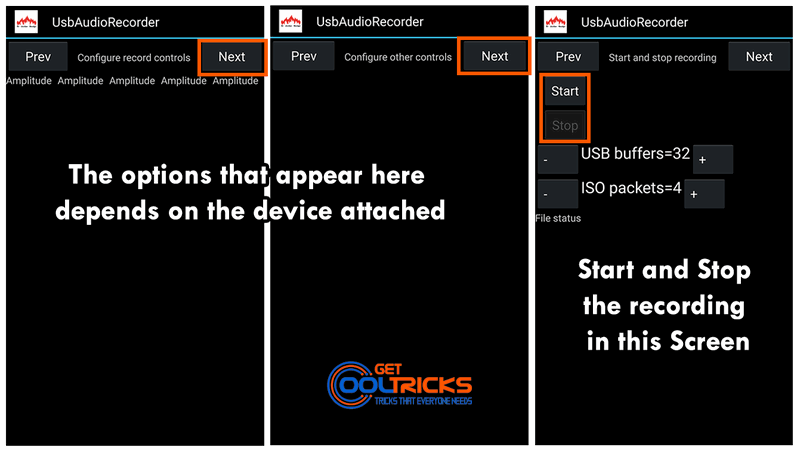
The ‘Record Controls screen’ appears next. My USB microphone does not provide any settings for this but for some microphones, it displays the option for Audio Gain. Click ‘Next‘ and you will be taken to the ‘Configure Other controls’ screen. My microphone did not show any settings on this screen as well. If your microphone shows any settings, check and configure the options and tap ‘Next‘. The final screen appears. You can start and stop the recording here. Check the screenshots provided for reference.
You can access the recorded files stored in the external storage card on a folder named ‘recordings‘. I have recorded a sample using the Samson Go Mic on my Lenovo Smartphone. The recording quality is awesome when compared with the audio recorded using the default microphone.
Other People are reading
- How to find lost or stolen Android smartphone?
- Run multiple accounts of the same App on Android phone
- How to Change Bootlogo in MediaTek Smartphones
- Smart Phone Flash Tool (SPFT) – Tutorial
You have now learned to record good quality audios using the USB microphone on your Android Smartphone. Leave your valuable feedback and suggestions in the comment box below.
I used USB C OTG with Open camera and a zoom h4n. I had two main issues, one was some latency, or unsynced audio/video; and the worse issue was the audio processing itself.
I tried using both open camera and some usb recorders, and every time the sound was a higher pitched than what I recorded. For example, if I spoke, my voice was higher, if I played the piano, then a C got recorded as a D note, and a D as an E, so it was modulated up half a step. Do you have any idea why?
I set the zoom to use plug in power, and to record either direct or mic @ 44.1khz.