Question: My Kingston USB flash stick has over 14GB of free space, but I cannot copy a 7GB file to the USB drive. Windows 10 pops up warning “The file ‘xx’ is too large for the destination file system”. Is there a FAT32 4GB limit workaround?
Answer: Yes, it is highly possible that your USB flash stick is on FAT32, which is a file system that doesn’t allow the transfer of an individual file over 4GB. Find the solution in this tutorial.
See if Your Storage Device is FAT32
- Connect your storage device to a Windows computer.
- Open Windows Explorer (My Computer).
- Right-click on the storage device, and choose Properties.
- See if the “File System:” is FAT32.
FAT32 4GB Limit
Simply speaking, people cannot copy or move an individual file over 4GB to a FAT32 drive, even if they have enough free space on the drive. The reason is that FAT32 was designed over 20 years ago, and even though new file systems that allow larger capacity has been created, FAT32 is still popular on USB flash drive, memory card, digital camera, DVD, etc. Of course, other FAT (File Allocation Table) systems, FAT16 and FAT12, has stricter limits for a single file. By the way, the maximal volume size of files of FAT32 is 2TB (or the physical capacity of the drive, which is usually smaller).
In fact, given that a random BluRay video often exceeds 5GB, people need to find out a FAT32 4GB limit workaround, which has been proofed to be possible and multi-method.
Before we introduce the technical solutions, let’s check the files you need to transfer and see whether there are easy ways to avoid the limit.
- If you are going to transfer a compressed file, which contains several small files, then try extracting them out and copy and paste (see why you should not use cut and paste) the whole folder to the destination folder. This should work when none of the files on the folder exceed 4GB.
- If it is a single file itself, then consider compressing it as a smaller file. If the compressed file is smaller than 4GB, just do the transfer. However, depending on the exact file type and the archive software you use, the compression ratio may not always be ideal enough.
Solution 1. Convert FAT32 as exFAT or NTFS
Both exFAT and NTFS have a way larger capacity to store big files, but differences between will show in later usage. Just choose the one you think better fits your needs, and you could reverse it whenever you want in the future.
The NTFS file system is supported by all modern versions of Windows, and it also supports many other functions: file security, encryption, compression, etc. However, non-Windows devices, like Android tablets and Mac computers, may not recognize NTFS drive without additional software.
On the contrary, the exFAT system is not as advanced as NTFS, but it supports better on non-Windows platforms. For example, many Android phones and tablets, as well as the recent versions of macOS support exFAT devices.
Step 1. Back up the files on your FAT32 drive to PC.
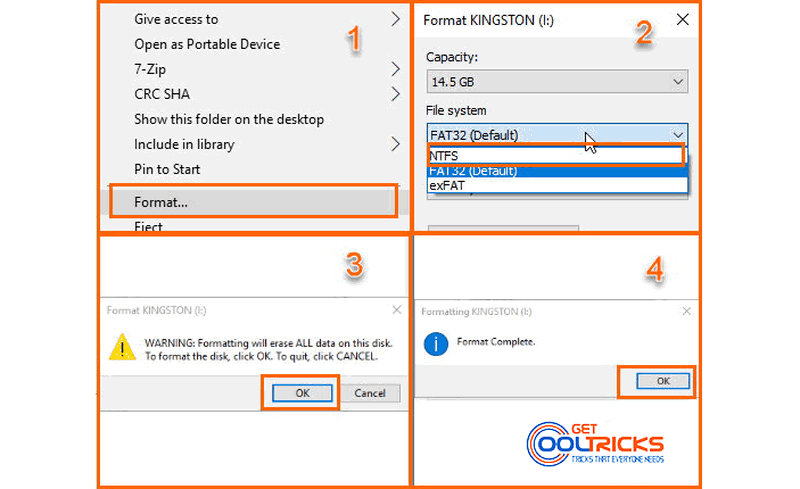
Step 2. Right-click on the FAT32 drive on Windows Explorer, and click Format…
Step 3. Choose exFAT or NTFS. Leave other options as default.
Step 4. Click Start, and then OK when the WARNING pops up (make sure you have done Step 1).
Step 5. Click OK when formatting completes, and close the format window. See the following image for detail.
Now the 4GB limit should no longer exist on your storage device.
By moving files to a PC or somewhere safe, this method won’t cause any data loss. Nevertheless, if you really want to convert FAT32 to NTFS or exFAT without formatting, you may try some software that provides this function, which is easy to find over the internet. These tools may claim that the convert won’t wipe files on the drive, but it is always suggested to make the backup(s) for your important data. PS: People report that PS3 doesn’t recognize drives another FAT32 system. You may need to test it by yourself. If it is true, please try Solution 2.
Solution 2. Split Large File into Small Parts
By splitting large files into small parts, we can bypass the 4GB limit of FAT32 and move all the parts to the storage device. Then, just extract the original files from the parts. In this method, however, you should make sure that the storage device has enough room for both the split parts and the file to be extracted, which means the FAT32 drive should have 2 times of space of the original file.
Step 1. Install 7-Zip (Download 7-Zip – External Link, Use with Caution) on your computer. Other software, like WinRAR, can also do the work.
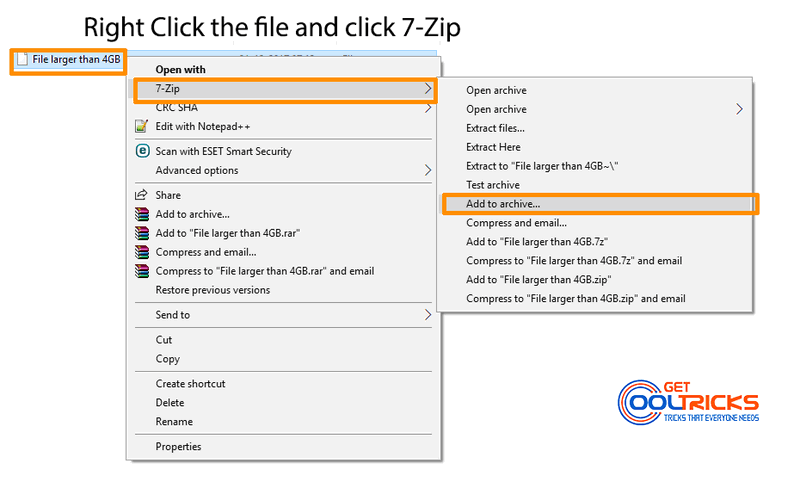
Step 2. Right-click on the large file.
Step 3. Move the mouse over 7-Zip, and then click “Add to archive…” on the extended menu.
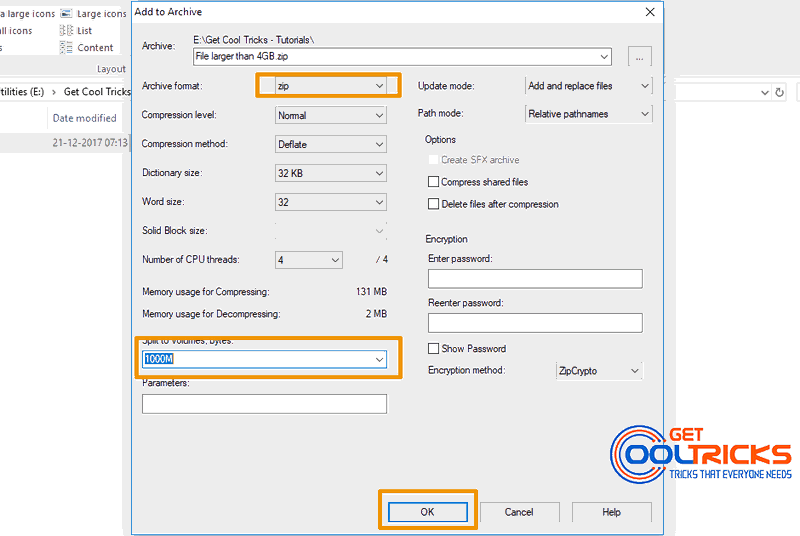
Step 4. On Add to archive window, change “Archive format” as zip and “Split to volumes, bytes:” as 1000M or smaller. You can also set the archive name and location, but in most cases, you don’t need to.
Step 5. Click OK and wait for the compression and split to finish.
Step 6. Move all the split parts to the destination folder on your FAT32 drive.
Check the following screenshots for reference.
Extracting the file Split into Multiple Zips
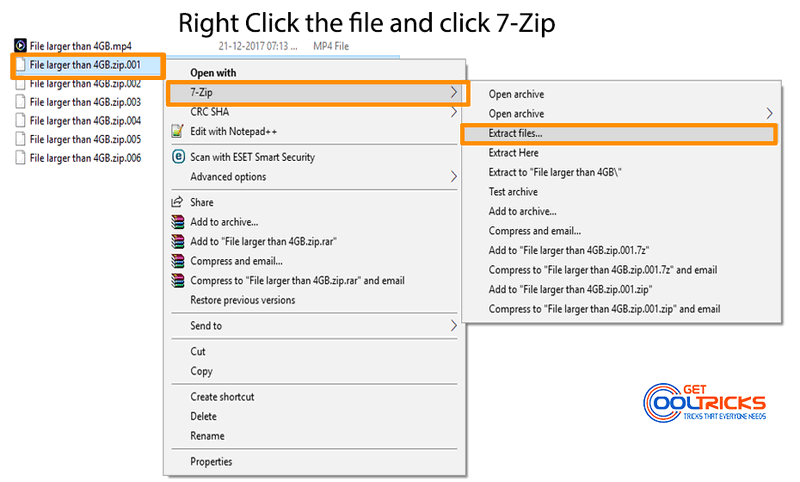
Step 1. Right-click on the first archive file (with the name followed by 001), and choose 7-Zip and then choose “Extract Files…” (If you want to extract the files to a custom directory) or “Extract here” (If you want to extract the file to the same directory).
Step 2. The archive tool will extract the original file from all the split parts to a sub-folder within the current folder if you click “Extract Here“. If you click “Extract Files…“, another window appears showing the file location. Click OK to extract to the Current Directory where the split files are placed or choose a directory of your choice. Check the following screenshot for reference.
Other People are reading
- Recovering USB Drives (Pen Drives) from Folder Virus
- Windows 10 Installation Guide
- How to install Legacy Hardware devices in Windows
- Lenovo Connect2 – Complete Tutorial
You have now learned to transfer files larger than 4GB to the FAT32 USB drive. Comment your thoughts and suggestions in the comment box below.
The the extracted large file is not the same from the source large file when extracted from split compressed file. I’m using 7zip.
Hello Feran,
This won’t be happening normally. Can you try this again by setting the compression level to the lowest possible? For Example, in Winrar, set the compression level to save. A similar option will be found in all the compression software.
Thanks.
FTP , Email and cloud methods to transfer large files is like fitting a square peg in a round hole. One of my fav tools to transfer large files is Binfer. More https://www.binfer.com/send-large-files/